LIRC with Python
The following is to use Python on the Raspberry Pi to receive/transmit infrared signals. ie: To have the Raspberry Pi act as an IR remote control unit.
Requirements
Components Required:
- Raspberry PI 3
- 220ohms resistors
- LED
- IR LED
- BC547 (PnP) Transistors
- TSOP4838 IR Recievers
- Breadboard
- Jumper cables
Wiring
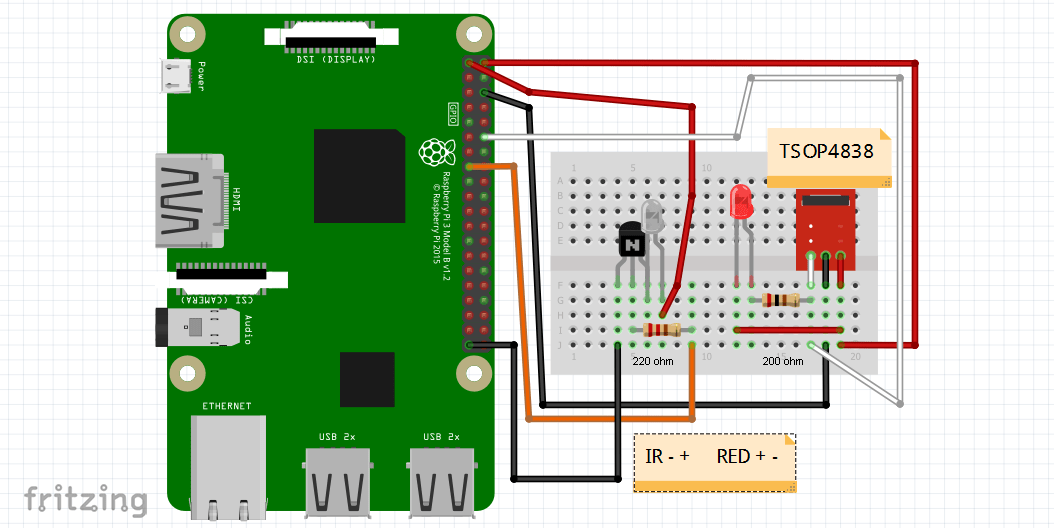
- Warning: Check the pin layout of your IR receiver as some of them are wired with the data and ground pins swapped
Raspberry Pi configuration
Ensure your Raspberry Pi is up to date
sudo apt-get update
sudo apt-get upgrade
Install LIRC
sudo apt-get install lirc
Edit /etc/modules file
sudo nano /etc/modules
Add to the bottom of file:
lirc_dev
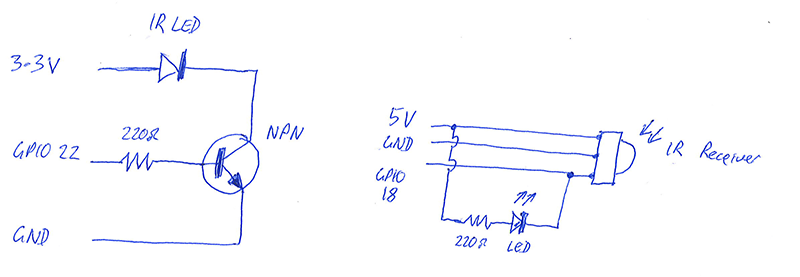
lirc_rpi gpio_in_pin=18 gpio_out_pin=22
Edit /etc/lirc/hardware.conf:
sudo nano /etc/lirc/hardware.conf
Change it to:
LIRCD_ARGS="--uinput"
LOAD_MODULES=true
DRIVER="default"
DEVICE="/dev/lirc0"
MODULES="lirc_rpi"
LIRCD_CONF=""
LIRCMD_CONF=""
Edit the /boot/config.txt file:
sudo nano /boot/config.txt
Add this line:
dtoverlay=lirc-rpi,gpio_in_pin=18,gpio_out_pin=22
Create /etc/modprobe.d/ir-remote.conf file:
sudo nano /etc/modprobe.d/ir-remote.conf
Add this line:
options lirc_rpi gpio_in_pin=18 gpio_out_pin=22
Go ahead and reboot the Pi:
sudo reboot
Test IR receiver
Time to test IR Reciever:
sudo modprobe lirc_rpi
then
sudo kill $(pidof lircd)
then
mode2 -d /dev/lirc0
At this point you should be able to press buttons on your remote and see output similar to this:
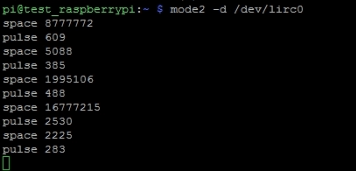
(hit “ctrl + c” to exit)
sudo kill $(pidof lircd)
save output to text file for future reference:
irrecord -d /dev/lirc0 /home/pi/lircd.conf
Recording IR signals
run
sudo kill $(pidof lircd)
then
irrecord --disable-namespace -d /dev/lirc0 /home/pi/lircd.conf
Important
- Carefully read and follow the prompts given by the program. The instructions are quite exact.
- Write down (case-sensitive) the name of your device and the names used for each key when prompted. These will be the codes you need to use in your program later.
verify /home/pi/lircd.conf created successfully:
cat /home/pi/lircd.conf
(if so continue, if not start over at MAPPING REMOTE CODES section)
copy/overwrite /home/pi/lircd.conf to /etc/lirc/
sudo cp /home/pi/lircd.conf /etc/lirc/lircd.conf
Restart LIRC:
sudo /etc/init.d/lircd restart
Sending IR signals
Before issuing commands run this:
sudo lircd --device /dev/lirc0
Test sample command:
- Note: 'projector' and 'Power' are the device name and key code as recorded in
/etc/lirc/lircd.conf
irsend SEND_ONCE projector Power
Python coding
#!/usr/bin/env python
import os
import time

#turn projector on, change input source etc
os.system('irsend SEND_ONCE projector Power')
time.sleep(12)
os.system('irsend SEND_ONCE projector Source')
time.sleep(4)
os.system('irsend SEND_ONCE projector Freeze')
time.sleep(4)
os.system('irsend SEND_ONCE projector Mute')
Sourced from
Sample lircd.conf
This was for an Epson projector
begin remote

  name  epson
  bits           16
  flags SPACE_ENC|CONST_LENGTH
  eps            30
  aeps          100

  header       9013  4452
  one           607  1646
  zero          607   521
  ptrail        608
  pre_data_bits   16
  pre_data       0xC1AA
  gap          107902
  toggle_bit_mask 0x0
  frequency    38000

      begin codes
          Power                    0x09F6
          Source                   0x31CE
          Freeze                   0x49B6
          Mute                     0xC936
      end codes

end remote