OpenCV
OpenCV is an open source computer vision and machine learning software library. It is available for several common programming languages, most notably C++, Python and Javascript. The main documentation is available at
You'll quickly come across the term cascades. Cascades are pre-trained functions that programmers can use to detect commonly sought after features such as faces, eyes, ears, full bodies etc.
To find a cascade that suits your project, try the following github repo's:
- https://github.com/opencv/opencv/tree/master/data/haarcascades
- https://github.com/opencv/opencv_contrib/tree/master/modules/face/data/cascades
VisionMadeEasy
To help beginner programmers get up and running even quicker, I've created a Python library called VisionMadeEasy that is available for install from the Python package repository. Either use PyCharm or pip to install as follows.
pip install visionmadeeasy
To successfully run the demo, you will also have to...
- Download a cascade file such as
haarcascade_frontalface_default.xmlfrom https://github.com/opencv/opencv/tree/master/data/haarcascades and save it into your project folder - Create a sub-folder called "datasets" in your project folder. This is where it will store your training photos.
- Make sure you have a web camera attached :-)
The demo code follows:
import visionmadeeasy
def i_see_a_face( location, img ):
print(f"I see a face!!! It is at {location['x']},{location['y']}")
return True # must return True to keep the loop alive
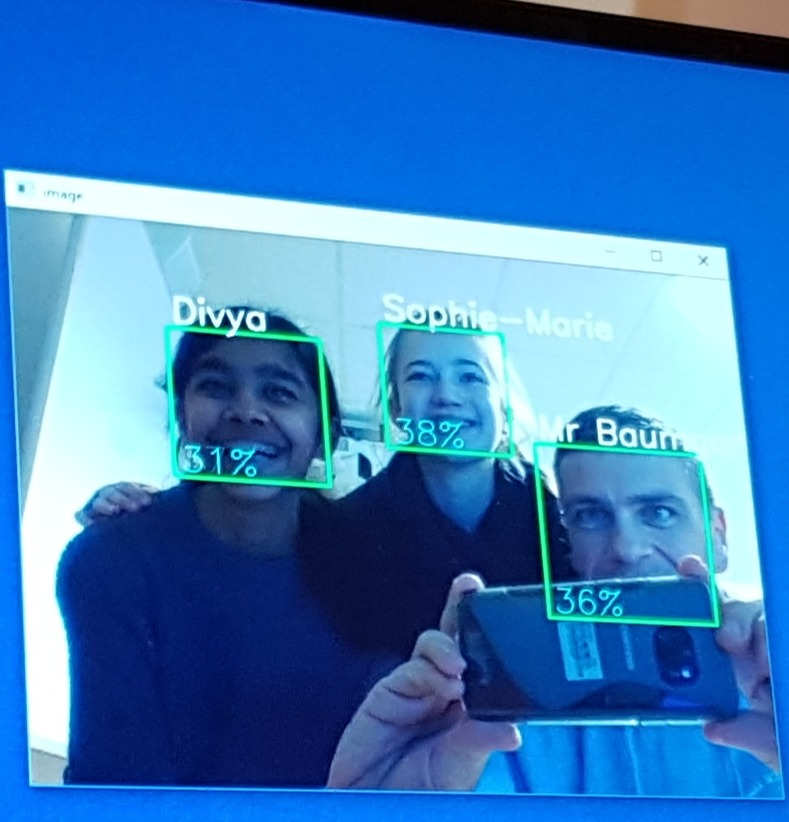
def i_recognise_a_face( location, person_name, confidence, img ):
print(f"Hello {person_name}! I am {confidence}% sure it is you :-)")
return True # must return True to keep the loop alive
if __name__ == "__main__":
vme = visionmadeeasy.VisionMadeEasy(0, "dataset")
quit = False
while not quit:
print("Demonstration time! Menu of options...")
print("1. Detect faces")
print("2. Record faces")
print("3. Train for faces recorded")
print("4. Recognise faces (must do training first)")
print("5. Exit")
choice = int(input("Enter your option (1 to 5):"))
if choice == 1:
print("[face_vision] Task: Searching for faces.\nLook at the camera! (press ESC to quit)")
# Demo of detecting faces
vme.detect_face(i_see_a_face)
elif choice == 2:
print("About to save 50 images of different angles etc of a person, saving to folder ./dataset")
id = int(input("Enter unique person number: "))
n = input("Enter person name: ")
print("Smile! :-)")
# Demo of recording faces
vme.record_face_dataset(images_to_record=50, interval=1, person_identifier=id, person_name=n)
elif choice == 3:
print("[face_vision] Task: Training... please wait...")
# Demo of training faces
vme.train_from_faces()
elif choice == 4:
print("[face_vision] Task: Searching for faces I recognise.\nLook at the camera! (press ESC to quit)")
# Demo of recognising faces
vme.recognise_face(i_recognise_a_face)
elif choice == 5:
quit = True
print("Goodbye!")
Automated photo booth
Those who attended the February 2019 middle school disco would be aware I had my laptop running an automated photo booth that was taking photos when it detected at least 3 people standing in front of it. I thought I might share the code for those who are interested.
from PIL import Image
import cv2                      # use opencv-contrib-python rather than opencv-python
import os, sys, time, math
import requests

class Vision():

    def __init__(self, camera_device_id=0, images_folder=".", cascade_file="haarcascade_frontalface_default.xml" ):
        self.camera_device_id=camera_device_id
        self.images_folder = images_folder
        if not os.path.exists(images_folder):
            exit("[SimpleVision] ERROR: images folder not found: "+images_folder)
        self.cascade_file = cascade_file
        if not os.path.exists(cascade_file):
            exit("[SimpleVision] ERROR: cascade file not found: "+cascade_file)
        self.cascade = cv2.CascadeClassifier(cascade_file)
        self.flip = False
        self.camera_width = 1280
        self.camera_height = 720
        self.min_detect_width = 70
        self.min_detect_height = 70
        self.mode = "scanning"
        self.wait_until = 0
        self.countdown_to = 0
        self.last_seen = []

    def set_camera_device(self, camera_device_id):
        """ Set the camera id number (default: 0) """
        self.camera_device_id=camera_device_id

    def set_camera_resolution(self, width, height):
        if isinstance(width, int) and isinstance(height, int) and width > 0 and width <= 4096 and height > 0 and height <= 4096:
            self.camera_width = width
            self.camera_height = height

    def set_flip(self, flip ):
        """ Set to true to vertically flip the image from the camera (usually required for Raspberry Pi) """
        if isinstance(flip, bool):
            self.flip = flip
        else:
            self.flip = False

    ### Internal/private functions

    def __get_camera(self):
        # cv2.namedWindow("preview") # Mac
        cap = cv2.VideoCapture(self.camera_device_id)
        cap.set(3, self.camera_width)
        cap.set(4, self.camera_height)
        return cap

    ### Public functions

    def detect_face(self, callback ):
        cap = self.__get_camera()
        loop = True # loop can be stopped by the callback function
        while loop:
            # Read image from the camera
            ret, img = cap.read()
            assert ret, "Error reading from capture device "+str(self.camera_device_id)
            if self.flip:
                img = cv2.flip(img, -1)
            if self.mode == "scanning" or self.mode=="wait a bit":
                # Convert image to grey scale
                gray = cv2.cvtColor(img, cv2.COLOR_BGR2GRAY)
                # Detect any faces in the image? Put in an array
                faces = self.cascade.detectMultiScale(
                    gray,
                    scaleFactor=1.2,
                    minNeighbors=5,
                    minSize=(self.min_detect_width, self.min_detect_height)
                )
                # For every face we found
                for (x,y,w,h) in faces:
                    # Draw a rectangle around the face
                    color = (0,255,255) # Yellow
                    if self.mode == "wait a bit":
                        color = (0,0,255) # Red
                    elif len(faces) >= 3:
                        color = (0,255,0) # Green
                    cv2.rectangle(img,(x,y),(x+w,y+h),color,2)
                if self.mode == "wait a bit":
                    if self.wait_until < time.time():
                        self.mode = "scanning"
                elif self.mode == "scanning":
                    if (len(faces) >= 3) and (callback is not None):
                        # I see three faces.
                        self.last_seen.append(int(time.time())) # add timestamp to occassions that 3 faces have been seen
                        for item in self.last_seen:
                            if item < int(time.time()-2.0):
                                self.last_seen.remove(item)
                        # print(self.mode,self.last_seen)
                        # Have I seen 3 faces at least 10 times in the last two seconds?
                        if len(self.last_seen) > 4:
                            self.mode = "photo"
                            self.countdown_to = time.time()+6
            elif self.mode == "photo":
                time_remaining = math.trunc(self.countdown_to-time.time())
                msg = str( time_remaining )
                if time_remaining > 0:
                    cv2.putText(img, msg, (450,400), cv2.FONT_HERSHEY_SIMPLEX, 15, (0,255,255), 15)
                elif time_remaining == 0:
                    print(self.mode,"Taking photo!")
                    ret, img = cap.read()
                    if self.flip:
                        img = cv2.flip(img, -1)
                    loop = callback(faces, img)
                    cv2.imshow('video',img)
                    self.mode = "wait a bit"
                    k = cv2.waitKey(30) & 0xff
                    time.sleep(3)
                    self.wait_until = time.time() + 5
            cv2.imshow('video',img)
            # Check for exit key press
            k = cv2.waitKey(30) & 0xff
            if k == 27: # press 'ESC' to quit
                break
        cap.release()
        cv2.destroyAllWindows()
        return img

def convert_cv2_to_pil( cv2_image ):
    import cv2
    from PIL import Image
    cv2_image_rgb = cv2.cvtColor(cv2_image, cv2.COLOR_BGR2RGB)
    pil_image = Image.fromarray(cv2_image_rgb)
    return pil_image

def convert_pil_to_cv2( pil_image ):
    import cv2
    import numpy as np
    from PIL import Image
    cv2_image = cv2.cvtColor(np.array(pil_image), cv2.COLOR_RGB2BGR)
    return cv2_image

def http_upload( url, local_filename ):
    files = {"file": open(local_filename, "rb")}
    r = requests.post(url, files=files)
    print(r)

def save_photo( location, image ):
    photo = convert_cv2_to_pil(image)
    filename = "full_photos/"+str(int(time.time())) + ".jpg"
    photo.save(filename)
    http_upload("http://www.cs.isl.ch:10004/photo/"+str(int(time.time())) + ".jpg", filename)
    return True # must return True to keep the loop alive

if __name__ == "__main__":
    v = Vision(0, "dataset")
    v.set_camera_resolution(1920, 1080)
    v.set_flip(True)
    v.detect_face(save_photo)
    print("Goodbye!")