Prerequisites
This will assume you already have Python installed and working on your computer, and that you know the basics of Python programming.
Install and setup
Note: If ever the ev3 asks for a password (such as if you SSH/Terminal into it and want to sudo for some reason) the default password is maker.
Step 1 - Setup a micro-SD card with the ev3dev software
- Download the latest "Stretch" image of ev3dev from https://www.ev3dev.org/downloads/ (currently
ev3dev-stretch-ev3-generic-2018-08-06) - Download and install Etcher https://etcher.io
- Use Etcher to put the
ev3dev-stretch-ev3-generic-2018-08-06.isofile onto your micro-SD card
Step 2 - Setup VS Code
- Download and install Microsoft VS Code from https://code.visualstudio.com/download
- Open VS Code, install the
ev3dev-browserandpythonextensions - Close and restart VS Code so the extensions are active
- Go to file / settings. Set "files.eol" to
\n(ie: make sure it is not\r\n) - Create a project folder on your computer, then in VS Code use File / Open to open the entire folder. (The EV3 extension will only work with entire folders, not individual files).
Step 3 - Connect the EV3 to VS Code on your computer
- Insert the micro-SD into the EV3
- Turn on the EV3. It will take a few minutes to boot up. When the EV3 screen has a list of options that shows the following, it is ready

- Use a USB cable to connect the EV3 to your computer. On the EV3 use the "PC" port (not the one labelled "USB"!)
- In VS Code, look for the EV3DEV-BROWSER section and click the bit of text that says "Click here to connect a device".

- At the top of VS Code, will appear a little pop up menu, click on the "ev3dev" when it appears (as shown)
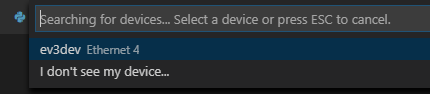
- Looking back at the EV3DEV-BROWSER section, a coloured circle should appear. Red = connection failed, yellow = connection in progress, green = connection successful.

- Once connected, you can click the little downward facing arrow to download your folder of python files to the EV3.
#!/usr/bin/env python3
import time
from ev3dev.ev3 import *
from ev3dev2.led import *

# Create variables
leds = Leds()
mB = LargeMotor('outB')
mC = LargeMotor('outC')

# Beeps and LED flashes
leds.all_off()
Sound.speak("I am E V 3, watch me dance.").wait()
for i in range(1,3): # run the indented loop three times
    leds.set_color("LEFT", "RED")
    leds.set_color("RIGHT", "GREEN")
    Sound.beep().wait()
    leds.set_color("LEFT", "GREEN")
    leds.set_color("RIGHT", "RED")
    Sound.beep().wait()

# Drive forward
leds.set_color("LEFT", "ORANGE")
leds.set_color("RIGHT", "ORANGE")
mB.run_forever(speed_sp=1000)
mC.run_forever(speed_sp=1000)
time.sleep(3)   # seconds
mB.stop(stop_action='brake')
mC.stop(stop_action='brake')

# Spin clockwise
leds.all_off()
leds.set_color("RIGHT", "ORANGE")
mB.run_forever(speed_sp=-1000) # negative = drive backwards
mC.run_forever(speed_sp=1000)
time.sleep(3)
mB.stop(stop_action='brake')
mC.stop(stop_action='brake')

# Spin anticlockwise
leds.all_off()
leds.set_color("LEFT", "ORANGE")
mB.run_forever(speed_sp=1000)
mC.run_forever(speed_sp=-1000) # negative = drive backwards
time.sleep(3)
mB.stop(stop_action='brake')
mC.stop(stop_action='brake')

# Say good bye
leds.set_color("LEFT", "RED")
leds.set_color("RIGHT", "RED")
Sound.beep().wait()
Sound.speak("Have a nice day.").wait()
leds.all_off()
#!/usr/bin/env python3
from ev3dev.ev3 import *
mB = LargeMotor('outB')
mC = LargeMotor('outC')

mB.run_forever(speed_sp=720)
mC.run_forever(speed_sp=720)

time.sleep(3)

mB.stop(stop_action='brake')
mC.stop(stop_action='brake')
# Turn wheel 180 degrees at speed 900 then apply strong brake.
mA.run_to_rel_pos( position_sp=180, speed_sp=900, stop_action="brake" )
# Turn wheel for 2000 milli seconds at speed 720
mA.run_timed(time_sp=2000, speed_sp=720)
# Turn wheel at speed 1080
mA.run_forever(speed_sp=1080)
# Stop actively turning and apply the brake
mA.stop(stop_action="brake")
# Stop actively turning, come to a rolling stop
mB.stop(stop_action="coast")
mC = LargeMotor('outC')
mC.run_timed(time_sp=3000, speed_sp=-750, stop_action='brake')
mC.wait_while('running')       # Wait until the 3 seconds has finished
from ev3dev.ev3 import *
# Setup
us = UltrasonicSensor()
assert us.connected, "Connect an EV3 ultrasonic sensor to any sensor port"

# Use
us.mode='US-DIST-CM'
distance = us.value()
if distance < 20:
   print("An object is less than 20 cm away")
# Setup
ts1 = TouchSensor('in1')
ts2 = TouchSensor('in2')
assert ts1.connected, "Connect an EV3 touch sensor to sensor port 1"
assert ts2.connected, "Connect an EV3 touch sensor to sensor port 2"

# Use
if ts1.value() and ts2.value():
   print("Both touch are being pressed")
# Setup
assert cs.connected, "Connect an EV3 color sensor to any sensor port"
cs.mode='COL-REFLECT'              # Color intensity mode

# Use
reflection = cs.value()            # Value will be between 0 and 99
if reflection < 25:
   print("It's very dark in here")
elif reflection > 75:
   print("I need my sunglasses!")
else:
   print("Just another grey day")
# Setup
cs = ColorSensor('in3')
assert cs.connected, "Connect an EV3 color sensor to any sensor port"
cs.mode='COL-COLOR'            # Color detection mode
colorlist = ('unknown','black','blue','green','yellow','red','white','brown')

# Use
if colorlist[cs.value()] == "blue":
   print("The sensor can see blue")
button = Button()
while not button.any():
    # Do something
if button.backspace:
    print("You pressed backspace, so I'm going to quit")
    exit()
def left(state):
   if state:
        print("Left button pressed")
        else:
          print("Left button released")

def right(state):
   if state:
        print("Right button pressed")

def up(state):
   pass # Empty response just for demo purposes

def down(state):
   pass # Empty response just for demo purposes

def enter(state):
   pass # Empty response just for demo purposes

def backspace(state):
   pass # Empty response just for demo purposes

button.on_left = left
button.on_right = right
button.on_up = up
button.on_down = down
button.on_enter = enter
button.on_backspace = backspace
from ev3dev2.led import *
leds = Leds()
leds.all_off()
leds.set_color("LEFT", "RED")
leds.set_color("RIGHT", "GREEN")
leds.set_color("RIGHT", "AMBER")
leds.set_color("RIGHT", "ORANGE")
leds.set_color("RIGHT", "YELLOW")
leds.set_color("RIGHT", "BLACK")
from ev3dev.ev3 import *
Sound.beep()
frequency = 1500 # hertz
duration = 2000  # milli seconds
Sound.tone(frequency, duration)
Sound.play( "songfile.wav" )
Sound.speak("My name is C 3 P O. Human cyborg relations.")