Java: Swing GUIs
The following tutorial assumes you are using Jetbrains IntelliJ IDEA. Please download and install that if you don't already have it before continuing.
The massive advantage of using a proper Java IDE is that it allows you to create Swing GUI's via a drag-and-drop interface. It is a lot less hassle than coding it each element in Java individually!
Please adjust the following setting in IntelliJ, it will turn off a feature that causes no end of confusion with my students:
- Settings / Editor / General / Appearance / Show parameter name hints: OFF
Part 1 - Introduction
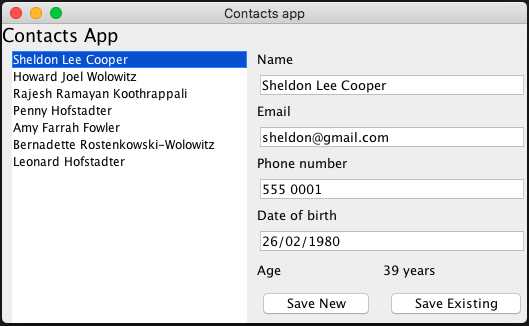
A quick introduction to the demonstration project we will build. It is a contacts manager that will look like this...
- Video 1 (1:48)
Part 2 - Create the GUI
Use the drag-and-drop GUI builder to make our screen.
- Video 2 (8:01)
Part 3 - Code Person class
Write the Person class we will use as the basis of the data in this project.
- Video 3 (6:44)
Part 4 - Code JFrame
Program the JFrame to visualise.
- Video 4 (4:44)
Part 5 - Populate JList
Program the list to display an entry for each person, and to refresh it's list when we require it.
- Video 5 (12:46)
Copy and paste the demo data I used if you wish...
Person sheldon = new Person("Sheldon Lee Cooper", "sheldon@gmail.com", "555 0001", "26/02/1980");
Person howard = new Person("Howard Joel Wolowitz", "howard@gmail.com", "555 0002", "01/03/1981");
Person bernadette = new Person("Bernadette Rostenkowski-Wolowitz", "bernadette@gmail.com", "555 0002", "01/01/1984");
Person raj = new Person("Rajesh Ramayan Koothrappali", "raj@gmail.com", "555 0003", "06/10/1981");
Person penny = new Person("Penny Hofstadter", "penny@gmail.com", "555 0004", "02/12/1985");
Person leonard = new Person("Leonard Hofstadter", "leonard@gmail.com", "555 0004", "17/05/1980");
Person amy = new Person("Amy Farrah Fowler", "amy@gmail.com", "555 0005", "17/12/1979");
Part 6 - JList selection action
Program the list so that when an item is selected, it populates the respective textFields with information about that person.
- Video 6 (8:18)
Part 7 - JButton selection action
Program the buttons to save a new person or update an existing one to the people ArrayList.
- Video 7 (10:34)
Part 8 - Refactor code
Reorganise some of the code to (hopefully) make it more intuitive for beginner programmers.
- Video 8 (8:26)
Extension task: Persistent data
Here is the JSON data you can save to a file. I suggested at the end of video 7 to attempt to load this data from a data file instead of hard coding it. Refer to my JSON notes for more on this.
[
  {"phoneNumber":"555 0001","dateOfBirthString":"26/02/1980","name":"Sheldon Lee Cooper","dateOfBirth":"1980-02-26","age":39,"email":"sheldon@gmail.com"},
  {"phoneNumber":"555 0002","dateOfBirthString":"01/03/1981","name":"Howard Joel Wolowitz","dateOfBirth":"1981-03-01","age":38,"email":"howard@gmail.com"},
  {"phoneNumber":"555 0003","dateOfBirthString":"06/10/1981","name":"Rajesh Ramayan Koothrappali","dateOfBirth":"1981-10-06","age":37,"email":"raj@gmail.com"},
  {"phoneNumber":"555 0004","dateOfBirthString":"02/12/1985","name":"Penny Hofstadter","dateOfBirth":"1985-12-02","age":33,"email":"penny@gmail.com"},
  {"phoneNumber":"555 0005","dateOfBirthString":"17/12/1979","name":"Amy Farrah Fowler","dateOfBirth":"1979-12-17","age":39,"email":"amy@gmail.com"},
  {"phoneNumber":"555 0002","dateOfBirthString":"01/01/1984","name":"Bernadette Rostenkowski-Wolowitz","dateOfBirth":"1984-01-01","age":35,"email":"bernadette@gmail.com"},
  {"phoneNumber":"555 0006","dateOfBirthString":"17/05/1980","name":"Leonard Hofstadter","dateOfBirth":"1980-05-17","age":38,"email":"leonard@gmail.com"}
]
An alternative to JSON would be to use object serialisation to save/load the data direct into an ArrayList.
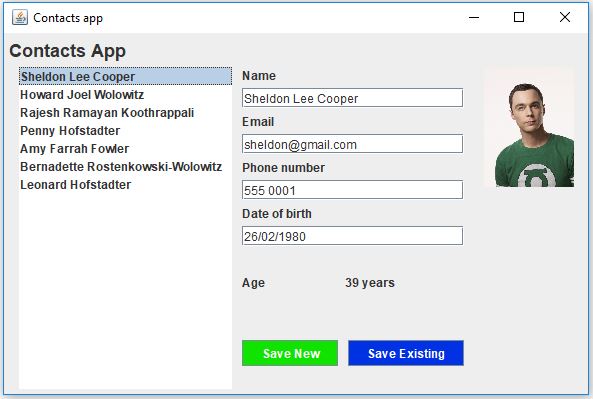
Extension task: Photos
Here's a tutorial that's a helpful tip on how to get started.
This is the look you are aiming for...
Extension: Build the completed JAR
Turning your completed project into a JAR file makes it distributable!
- File -> Project Structure -> Project Settings -> Artifacts -> Click green plus sign -> Jar -> From modules with dependencies...
The above sets the "skeleton" to where the jar will be saved to. To actually build and save it do the following:
- Extract to the target Jar
- OK
- Build -> Build Artifact