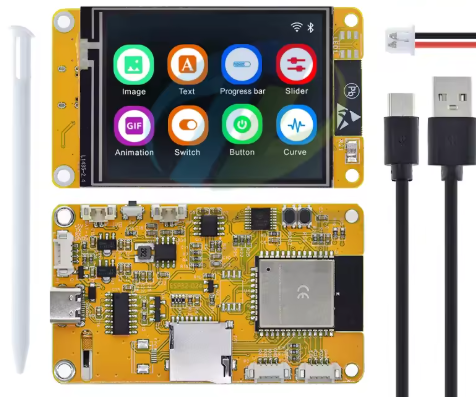
ESP32 Cheap Yellow Display
Specifications
The CYD-clone we are using at STC is as follows:
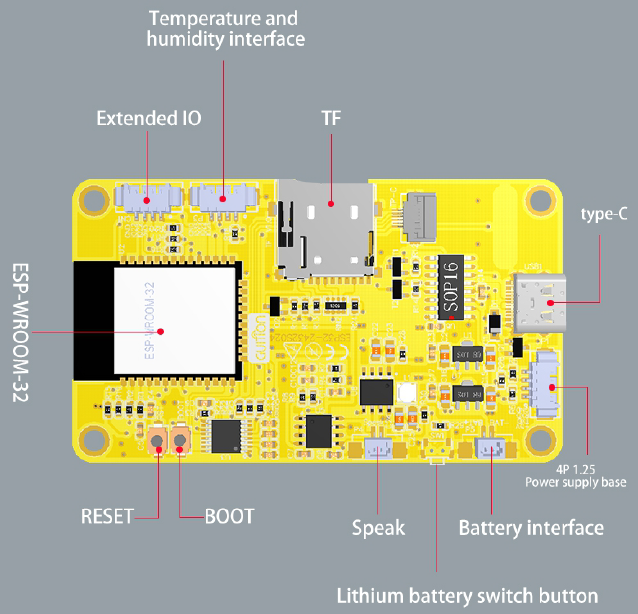
- ESP32-WROOM-32
- Wifi Bluetooth
- Dual-core MCU 240MHZ processor
- 520KB SRAM
- 448K ROM
- 4MB Flash storage
- 240x320 display, 16bit colour display ILI9341
- Resistive touchscreen XPT2046
- Backlight control
- Speaker circuit
- Photosensitive circuit
- RGB-LED
- Red LED: Pin 4
- Green LED: Pin 17
- Blue LED: Pin 16
- TF card interface
- Temperature & humidity sensor DHT11
- Power: 5V at 115mA
- GPIOs available: GPIO 35, GPIO 22, GPIO 21, and GPIO 27
- Vendor: TZT store, Aliexpress
Pin out
Reference
Display - Basic control
display.clear(color_code)- Description: Fills the entire screen with the specified color. Defaults to black if no color is provided.
- Example:
display.clear(color['black'])
display.width/display.height- Description: Returns the display dimensions (e.g., 320 and 240).
- Example:
print(display.height)
display.cleanup()- Description: Safely shuts down the display.
- Example:
display.cleanup()
Display - Draw text
display.draw_text(x, y, text, font, fg_color, bg_color)- Description: Draws text using the configured font (unispace_font) at position (x,y).
- Example:
display.draw_text(0, 0, 'Hi', unispace_font, color['white'], color['black'])
Display - Draw shapes
display.draw_pixel(x, y, color_code)
- Description: Draws a single pixel at coordinates (x,y).
- Example:
display.draw_pixel(50, 50, color['white'])
display.draw_line(x1, y1, x2, y2, color_code)
- Description: Draws a line between points (x1,y1) and (x2,y2).
- Example:
display.draw_line(50, 0, 64, 40, color['yellow'])
display.draw_hline(x, y, w, color_code)
- Description: Draws a horizontal line starting at (x,y) with width w.
- Example:
display.draw_hline(10, 40, 70, color['magenta'])
display.draw_vline(x, y, h, color_code)
- Description: Draws a vertical line starting at (x,y) with height h.
- Example:
display.draw_vline(10, 0, 40, color['cyan'])
display.draw_lines(coords, color_code)
- Description: Draws a continuous line segment through a list of points (e.g., [[x1, y1], [x2, y2], …]).
- Example:
display.draw_lines([[0, 63], [78, 80]], color['cyan'])
display.draw_rectangle(x, y, w, h, color)
- Draw a rectangle
- Example:
display.draw_rectangle(0, 0, 15, 227, color['red']) - There is also a fill_rectangle() version, eg:
display.fill_rectangle(0, 0, 15, 227, color['red'])
display.draw_circle(x, y, r, color)
- Draw a circle
- Example:
display.draw_circle(132, 132, 70, color['green']) - There is also a fill_circle() version, eg:
display.fill_circle(132, 132, 70, color['green'])
display.draw_ellipse(x, y, rx, ry, color)
- Draw an ellipse
- Example:
display.draw_ellipse(x, y, rx, ry, color) - There is also a fill_ellipse() version, eg:
display.fill_ellipse(96, 96, 30, 16, color['red'])
Display - Draw images
display.draw_image(filename, x, y, w, h)
Draws a raw image file (.raw) from the filesystem at position (x, y) with dimensions w (width) and h (height).
Example: display.draw_image('welcome.raw', 140, 0, 180, 240) |
To convert a png or jpeg file to a raw file, use the function below.
# Utility to convert images to raw RGB565 format.

from PIL import Image       # pip install Pillow
from struct import pack
from os import path
import os
import sys

def convert_file(in_file, out_file):
    img = Image.open(in_file).convert('RGB')
    pixels = list(img.getdata())
    with open(out_file, 'wb') as f:
        for pix in pixels:
            r = (pix[0] >> 3) & 0x1F # 5 bits for red
            g = (pix[1] >> 2) & 0x3F # 6 bits for green
            b = (pix[2] >> 3) & 0x1F # 5 bits for blue
            f.write(pack('>H', (r << 11) + (g << 5) + b))
    print('Saved: ' + out_file)

PNG_FILE = "your photo.png"
RAW_FILE = "your photo.raw"
convert_file(PNG_FILE, RAW_FILE)
Touch screen
In the setup hardware section of your code, find this line…
touchscreen = Touch(spi_1, cs=machine.Pin(33), int_pin=machine.Pin(36), width=320, height=240)
Change it to this…
touchscreen = Touch(spi_1, cs=machine.Pin(33), int_pin=machine.Pin(36), width=320, height=240, int_handler=touchscreen_press)
Above it, paste this code:
touch_x = 0
touch_y = 0
touch_detected = False

def touchscreen_press(x, y):
    global touch_x, touch_y, touch_detected
    touch_x = x
    touch_y = y
    touch_detected = True
Then in your main the following will work…
    while True:
        green_led.on()
        sleep(0.5)
        green_led.off()
        sleep(0.5)
        # New touch detection code....
        if touch_detected:
            print(f"Touch detected at ({touch_x},{touch_y})")
            touch_detected = False # Reset the touch detection
Hardware control
| Object | Description | Example |
|---|---|---|
backlight | Control the screen backlight. | backlight.on() or backlight.off() |
red_led, green_led, blue_led | Control the onboard LEDs. Note (for complex reasons not going into here) these commands are reversed so on() will turn it OFF and off() will turn it ON. | red_led.on() (turn it off) or red_led.off() (turn it on) |
Driver libraries
- ili9341.py for the display
- xpt2046.py for the touchscreen
- xglcd_font.py text rendering for the display
- Unispace12x24.c sample font for the display
- stc.py Utility functions for STC projects (connect to wifi, get current time, send ntfy message)
Sample setup code
import machine
import os
from time import sleep
import stc
from ili9341 import Display, color565
from xglcd_font import XglcdFont
from xpt2046 import Touch

#########################################################
## Set up hardware - Do not make changes to this section
#########################################################

# Display and touchscreen
spi_1 = machine.SPI(1, baudrate=10000000, sck=machine.Pin(14), mosi=machine.Pin(13), miso=machine.Pin(12))
display = Display(spi_1, dc=machine.Pin(2), cs=machine.Pin(15), rst=machine.Pin(15), width=320, height=240, rotation=0)
touchscreen = Touch(spi_1, cs=machine.Pin(33), int_pin=machine.Pin(36), width=320, height=240)
# Font
unispace_font = XglcdFont('Unispace12x24.c', 12, 24)
# Backlight
backlight = machine.Pin(27, machine.Pin.OUT)
backlight.on()
# Onboard LED
red_led = machine.Pin(4, machine.Pin.OUT)
blue_led = machine.Pin(16, machine.Pin.OUT)
green_led = machine.Pin(17, machine.Pin.OUT)
red_led.on() # These LED controls are inverted :/
green_led.on()
blue_led.on()
# Color objects for TFT. Color codes are BGR
color = {}
color["white"] = color565(255, 255, 255)
color["grey"] = color565(64, 64, 64)
color["black"] = color565(0, 0, 0)
color["red"]  = color565(0, 0, 255)
color["green"]  = color565(0, 255, 0)
color["blue"]  = color565(255, 0, 0)
color["yellow"]  = color565(0, 255, 255)
color["magenta"]  = color565(255, 0, 255)
color["cyan"]  = color565(255, 255, 0)

#########################################################
## Start up code goes here
#########################################################

# Wifi networks - You may want to add your home wifi to this?
# for example: NETWORKS = [("SCWiFi","wifi1234"),("homewifi","password")]
NETWORKS = [("SCWiFi","wifi1234")]
connect_on_start = True

if __name__=="__main__":
    # Connect to wifi
    display.clear(color['black'])
    display.draw_text(0, 0, 'Connecting to wifi...', unispace_font, color['grey'], color['black'])
    ip = stc.connect_to_wifi(NETWORKS)

    # Fetch the current time
    if ip: # Only if we have a wifi connection
        display.clear(color['black'])
        display.draw_text(0, 0, 'Fetching time...', unispace_font, color['grey'], color['black'])
        stc.set_correct_time()

#########################################################
## Your main code goes here
#########################################################

if __name__=="__main__":
    display.clear(color['black'])
    display.draw_image('welcome.raw',140,0,180,240) # x, y, w, h
    display.draw_text(0, 0, 'Welcome to', unispace_font, color['cyan'], color['black'])
    display.draw_text(0, 25, 'Sha Tin College', unispace_font, color['cyan'], color['black'])
    display.draw_text(0, 50, 'Digital Design', unispace_font, color['cyan'], color['black'])
    display.draw_text(0, 100, 'TAMAGOTCHI', unispace_font, color['cyan'], color['black'])

    while True:
        green_led.on()
        sleep(0.5)
        green_led.off()
        sleep(0.5)